Deployment
The Senza command line tools allows deploying application stacks. This page will guide you through the steps necessary to deploy a Docker-based application with Senza.
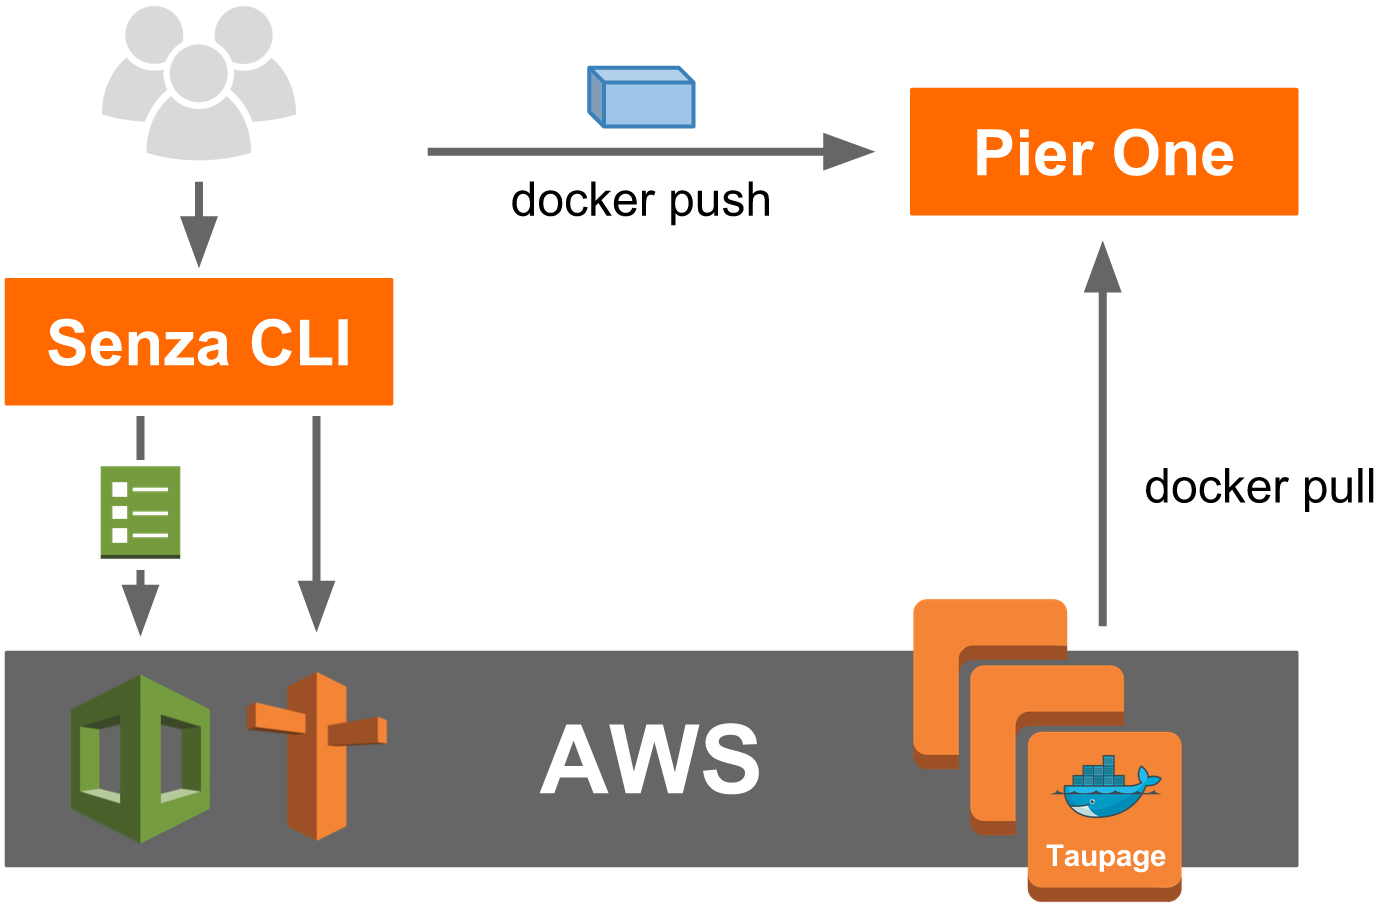
Senza was primarily designed to deploy immutable stacks of web applications:

Each immutable stack (application version) is a Cloud Formation stack with a load balancer (ELB), an auto scaling group and a versioned DNS domain. Traffic can be routed to different application versions by changing DNS weights in Route53.
Deploying a new immutable application stack generally involves:
- building your application artifact (e.g. uber jar)
- creating a Docker image
- pushing the Docker image to the Pier One Docker registry
- creating the Cloud Formation stack with Senza (
senza create) - routing traffic to the new stack (
senza traffic)
Prerequisites
First install Python 3.4 on your PC (Ubuntu 14.04 already has it installed, use Homebrew on Mac).
Note
OS X users may need to set their locale environment to UTF-8 with:
export LC_ALL=en_US.utf-8
export LANG=en_US.utf-8
Please check the section Local Setup for details regarding installing necessary packages.
All required STUPS command line tools can be conveniently installed from PyPI using PIP:
$ sudo pip3 install --upgrade stups
If your STUPS administrator has set up autoconfig, all CLI tools should get configured with a single command:
$ stups configure
Otherwise, you will need the following information at hand:
- Pier One Docker registry URL (we will use https://pierone.stups.example.org here)
- SAML identity provider URL (for federated AWS login with Mai)
- your SAML username and password
- OAuth Token service URL (to acquire OAuth tokens, e.g. for Pier One)
- your OAuth realm’s username and password
Prepare the deployment artifact
First deploy the application’s artifact (Docker image) to Pier One, e.g.:
$ cd myapp # enter your application's source folder
$ # please remember to generate the "scm-source.json",
$ # which must be in your Docker image!
$ docker build -t pierone.stups.example.org/myteam/myapp:0.1 .
$ pierone login # login to Pier One using OAuth
$ docker push pierone.stups.example.org/myteam/myapp:0.1
Create a new Senza definition
In order to call AWS endpoints and to create the Cloud Formation stack, we need to login with Mai:
$ mai create myteam # create a new profile (if you haven't done so)
$ mai # login
Next you need to create a new Senza deployment definition YAML file.
This can be done conveniently with the senza init command:
$ senza init myapp.yaml
Note
We assume you have your default AWS region ID (e.g. “eu-west-1”) configured in ~/.aws/config, alternatively you can pass the --region option to Senza.
See the AWS CLI docs for details.
senza init will guide you through a bunch of questions.
Use the “webapp” template and choose the default answers to get a ready-to-use hello world application.
Senza will also create the necessary security groups for you.
Deploying your application with Senza
Now we can create the application’s Cloud Formation stack with Senza:
$ senza create myapp.yaml 1 0.1 # will create stack version "1"
Note
The last parameter is a custom parameter “ImageVersion” defined in the SenzaInfo/Parameters section of the above definition YAML.
The stack creation will take some time, we can use the events command to monitor the progress:
$ senza events myapp.yaml 1 --watch=2
The --watch option tells Senza to refresh the display every 2 seconds until we press CTRL-C.
The “events” command will eventually show CREATE_COMPLETE for the CloudFormation::Stack resource if everything went well.
Senza also provides a wait command to wait for the stack creation to complete successfully:
$ senza wait myapp.yaml 1
The wait command is useful for automated scripts (e.g. in delivery pipelines) to actively wait for the deployment to finish.
Senza allows printing the EC2 instance console output to help debugging boot problems:
$ senza console myapp.yaml 1 # print last 25 lines of console output for every instance
$ senza console 172.31.1.2   # print last 25 lines of console output for a single instance
Note
Please note that the EC2 instance console output is not a live stream, i.e. the posted output is not continuously updated; only when it is “likely” to be of the most value. This includes shortly after instance boot, after reboot, and when the instance terminates. See Getting Console Output and Rebooting Instances in the AWS docs for details.
Read the section SSH Access on how to get shell access to your EC2 instances (if needed).
Routing traffic to your application
Your new application stack should be accessible via the version domain, e.g. “myapp-1.example.org”. You can use the version domain to verify that your application is working (e.g. via automated regression tests).
Eventually you want to route “real” traffic via the main domain (e.g. “myapp.example.org”) to your new application stack. This can be done via Senza`s “traffic” command:
$ senza traffic myapp.yaml 1 100 # route 100% traffic to stack version 1
Use dig to check whether the DNS settings are already updated:
$ dig myapp-1.example.org
> ;; ANSWER SECTION:
  myapp.exmaple.org. 20     IN      CNAME   myapp-1-123456789.eu-west-1.elb.amazonaws.com.
$ # ^ this is good, myapp.example.org redirects to myapp-1.example.org
Depending on your physical location there might be a bunch of DNS caches between you and Amazon.
Since they do not update quickly you can enforce to check the AMZN DNS.
Look up the address of the nameservers in your AWS account (Route 53 -> example.org Hosted Zone Details -> Nameservers), they look like ns-123.awsdns-55.com.
$ dig myapp-1.example.org @ns-123.awsdns-55.com